How to Style • 8 MIN READ • OCTOBER 8, 2026
Hidden Helix Jewelry: Styling, Sizing and Piercing Aftercare
An expert overview on styling, sizing and aftercare for the floating cartilage trend.
By Aurelia Vance-Sterling (Editor-in-Chief and Haute Couture Critic)
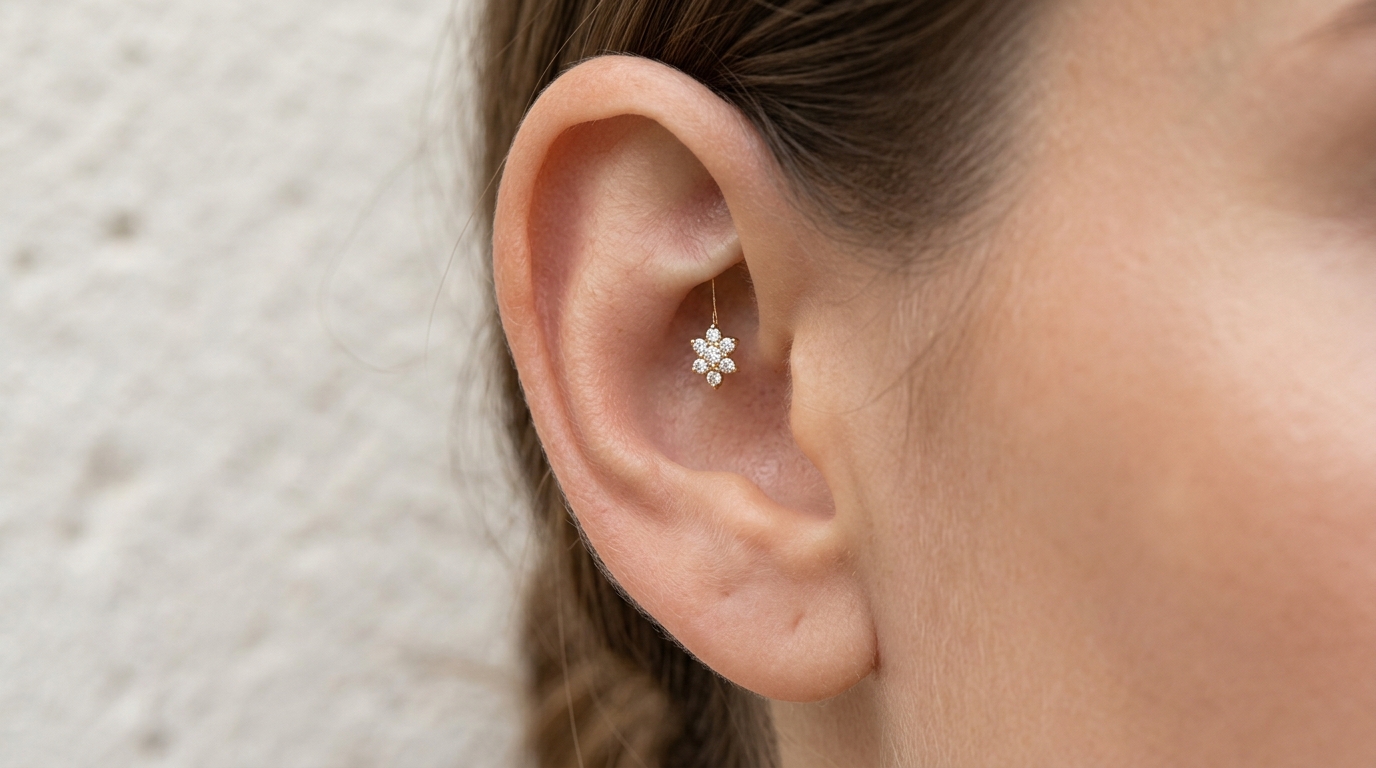
Hidden helix jewelry rests gracefully underneath the upper rim fold of the ear, creating the magical illusion of a floating charm. This refined placement tucks the decorative front beneath a protective canopy of skin and cartilage. As a result, the ornament appears suspended in midair rather than anchored directly to the edge of the ear. Fashion enthusiasts appreciate this sophisticated aesthetic for its subtle yet striking approach to modern fine jewelry styling.
How the Floating Cartilage Placement Works
Creating this suspended illusion relies entirely on your unique ear anatomy and the skilled hands of a professional piercer. Your upper ear rim must possess a sufficiently defined fold to successfully shelter the decorative top of the piece. When placed correctly, the hidden helix jewelry sits comfortably sheltered beneath this natural hood of cartilage while the charm peeks out from the shadow. This technique protects the gemstone or precious metal motif from everyday snags while offering an unexpected flash of luxury.
The physical placement requires precise angling to ensure the back-plate rests flush against the flat expanse behind the ear. Professional piercers study the natural curve of your cartilage fold to determine the exact exit point for the post. If the fold is too shallow, the ornament will simply slide outward and lose its concealed quality. Therefore, a careful consultation with an experienced piercer remains a mandatory first step before purchasing any precious adornments.
Choosing the Right Metals for Comfort and Safety
Selecting appropriate materials for your ear decorations protects your sensitive skin and ensures a smooth, irritation-free healing period. High-end fashion demands uncompromising quality, especially when placing new pieces inside delicate cartilage tissue.
Why Titanium Is Best for Fresh Piercings
Initial piercings require hypoallergenic, nickel-free metals that encourage calm healing without adverse reactions. Professional piercers universally recommend implant-grade titanium conforming to ASTM F-136 standards for all fresh hidden helix jewelry titanium installations. This exceptional metal is lightweight, completely body-friendly and accepts a brilliant high polish that mimics white gold. Piercers typically use a 16 gauge or 18 gauge threadless push-pin labret stud to initiate the healing process securely.
Selecting Solid Gold for Healed Setups
Once your tissue fully heals, you can transition safely into luxurious solid 14k or 18k hidden helix jewelry gold pieces. Premium gold hidden helix jewelry brings a warm, timeless glow to your upper ear styling without risking unsightly tarnish. Avoid inexpensive gold-plated or costume base metals entirely, as cheap alloys quickly flake away, turn your skin green and trigger painful bumps. Genuine solid gold pieces maintain their radiant luster indefinitely, making them a sound investment for your permanent collection.
Starter Studs versus Decorative Styles
Styling your upper ear requires patience and a gradual approach to prevent unnecessary irritation during the initial months. Transitioning from simple starter pieces to ornate designs marks an exciting milestone in your personal styling routine.
Starting with Flat-Back Labret Studs
Your initial piercing must heal around a simple, stable foundation rather than a heavy or ornate design. Piercers install an 8mm flat-back labret stud to accommodate normal tissue swelling during the first few weeks. The flat disc at the back prevents the post from catching on hair or clothing while you sleep and move. Never attempt to wear hoops or dangling chains during the primary healing window.
Upgrading to Dangling Chains and Charms
After your tissue completely heals over six to twelve months, you can finally wear elaborate hidden helix piercing jewelry options. Cascading chains, diamond clusters and dangling gemstone charms add dramatic movement and texture to your ear stack. These decorative pieces catch the light beautifully when paired with sophisticated evening attire or casual daytime ensembles.
Coordinating Your Piercing with Daily Outfits
Integrating your upper ear adornments into your daily wardrobe creates a harmonious and intentional personal style. When wearing elegant types of dresses, a subtle floating gemstone adds a whisper of luxury to bare shoulders and necklines. You can also match your metal tones to the hardware on your handbags and belts for a cohesive aesthetic.
During cooler months, consider how your jewelry interacts with high collars, scarves and cozy winter knitwear. If your seasonal wardrobe leans toward a soft summer color palette featuring muted pastels and dusty blues, choose white gold or titanium settings. Conversely, warm yellow gold pieces gracefully complement rich autumn earth tones and lively seasonal prints.
Downsizing Schedule and Daily Cleaning
Maintaining a healthy piercing requires strict adherence to proper downsizing appointments and daily hygiene routines. Your initial 8mm post must be shortened down to a 5mm or 6mm length between four to eight weeks once initial swelling subsides. This professional downsizing prevents the longer post from shifting, tilting, or catching on stray hairs.
Effective daily maintenance involves very simple steps that protect your sensitive new piercing from irritation. Spray the area twice daily with a 0.9% sterile saline solution to gently cleanse away accumulated debris. Dry the surrounding skin carefully afterward by gently patting the area with a clean, disposable paper towel. Always sleep on a specialized donut pillow to keep all pressure off your healing ear throughout the night.
- Visit your professional piercer for a downsizing appointment between week four and week eight.
- Clean the piercing site twice daily using a pre-made sterile 0.9% saline spray.
- Sleep on a travel pillow with a center cutout to avoid putting pressure on your fresh ear cartilage.
Frequently Asked Questions
Can everyone get a hidden helix piercing?
No, you need a sufficiently folded upper cartilage rim to properly conceal and support this specific placement.
How much does a hidden helix hurt?
The procedure causes a brief, sharp pinch that quickly subsides into a dull, warm throbbing sensation.
How long does a hidden helix take to heal?
Cartilage tissue typically requires six to twelve months to achieve complete and stable internal healing.
What jewelry is best for a fresh hidden helix?
An implant-grade titanium flat-back labret stud is the safest and most reliable choice for a fresh piercing.